
Follow ZDNET: Add us as a preferred source on Google.
ZDNET’s key takeaways
- A system image can save you from disaster.
- System imaging backs up your entire PC — OS and all.
- Clonezilla is a free tool to create system images.
Have you ever had that sickening feeling in your gut when you know your computer is just days or weeks away from dying an untimely death? I’ve been there several times over the decades.
When the eventuality comes to pass, unless you have a good backup of your data, you could be in for a long and frustrating uphill battle.
Having your data backed up is one thing. Knowing that you also might have to purchase a new system, install all of the apps you need, find the licenses that go with those apps, and configure your operating system as you had it can be a daunting task.
But what if you could do a backup of your computer that includes everything? Operating system, settings, apps, accounts… everything? Now, imagine you have such a backup, and you purchase a new computer, only to have to restore that backup to the new system, and you’re back to where you left off, not skipping a beat.
That’s the kind of backup that I’m talking about.
It’s called an image.
Also: The best Linux distributions for beginners: Expert tested and reviewed
You create an image of the current state of your system, knowing that you can use that image to restore a new machine to exactly where your old system was before it conked out.
This is actually easier than you think, thanks to a tool called Clonezilla.
Clonezilla is essentially a stripped-down version of Linux that you boot and then create an image of your Linux, MacOS, or Windows machine, saving it to an external drive. When you need to restore the image to a different machine, you connect the external drive housing the image, boot up Clonezilla, and run the restore.
Now, there are a few things you need to know about this first:
You have to create a bootable USB drive with Clonezilla for this to work.
The destination (new) machine has to have the same architecture as the source machine (in other words, you can’t restore an Intel image to an AMD computer)
The drive on the new machine has to be the same size or larger than the original.
If your system uses UEFI secure boot, you must use the AMD64 (X86-64) version (either Debian-based or Ubuntu-based) of Clonezilla live.
Also: My top 5 user-friendly GUI backup tools for the Linux desktop (and why you need one)
I’m going to walk you through the process of creating an image of your current machine with Clonezilla. Keep in mind that Clonezilla is an ncurses-based (which is text-based), but it’s not challenging at all.
Creating a backup image with Clonezilla
Before you do this, make sure the external drive that will house the image is connected to your PC. Reboot the machine to be imaged using the newly-created USB drive.
At the first screen of the Clonezilla wizard, make sure Start Clonezilla is highlighted and hit Enter on your keyboard.
The ncurses-based UI is nothing to fear.
Jack Wallen/ZDNET
In the next window, you need to select the mode you want to use. In our case, we want device-image.
You can also opt to clone a remote source with Clonezilla.
Jack Wallen/ZDNET
In the next screen, you must specify the destination for which the image will be housed. Since we’re using an external drive, select local_dev.
You can also save the image to a remote machine if you need.
Jack Wallen/ZDNET
In the next window, select the external drive that will house your image and hit Enter. In my example, I’m running Clonezilla as a virtual machine (so I can take screenshots), and there’s only one drive to select.
I’m running this on a virtual machine so I can take screenshots.
Jack Wallen/ZDNET
Finish the wizard
At this point, I’m going to describe the next few steps for you (as they are similar to what you experienced above). The next screens of the wizard are as follows:
- Select the user mode: Choose Beginner.
- Select the image type: Choose savedisk.
- Name the image: You can now name the image to be saved. I would suggest adding the date to the name, so you know when the image was created.
- Choose the source disk: You will be prompted to select which disk is to be imaged. This should be the drive that houses your OS and data.
- Select the compression level: Choose between z1p and z9p. If you have a modern machine, I would suggest going with z9p. Z1P offers the lowest compression level, while Z9P is the highest. Z9P results in better compression ratios, but requires more processing power and time compared to Z1P.
- Check or no check: Select if you want to first run a check/repair on the system before saving it. This option only works on Linux, so if you’re imaging a Windows machine, make sure to select sfsck (to skip the check/repair).
- Check the image: You can now instruct Clonezilla to check the saved image to ensure that it’s restorable. For that, select Yes and hit Enter.
- Encrypt or not: You can also choose to encrypt your image (for security purposes). Keep in mind that if you do not remember the passphrase used for the encryption, you will not be able to restore your image.
- Log files: You can also opt to copy log files to a Clonezilla live USB drive. Just hit Enter here.
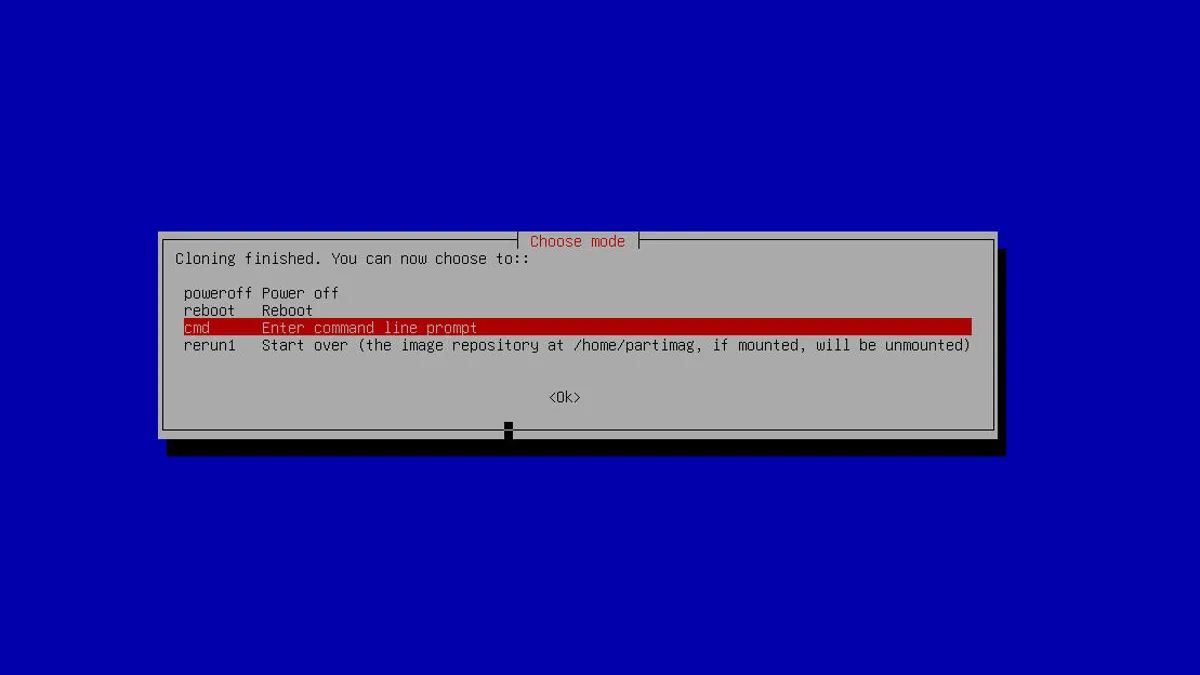
- What to do when done: Instruct Clonezilla on what to do when the imaging is finished. You can either select to enter the command prompt, reboot, or shut down.
- Let ‘er rip: You’ll be prompted to hit Enter to start the process.
Depending on how much data is on the drive to be imaged, this can take some time. Step away from your desk and do something else. When the imaging is finished, Clonezilla will either drop to the command prompt, reboot the system, or shut it down (depending on how you’ve configured it).
When the cloning is finished, remove the external drive and place it somewhere safe.
Don’t forget data backups
The data on your system will also be imaged. Keep in mind, however, that if you use your machine after the imaging is finished, the data will have changed. Because of that, I also suggest you do incremental backups of your data. By doing this, you can be certain that after restoring the image to a new machine, you’ll have the latest data to restore as well.
Also: 5 command line backup tools every Linux user should use for desktops and servers
